Converting Digital Images for Knit Designs
The electronic technology of today gives us new tools for designing knitwear by using scanners, digital cameras, and computer software
The electronic technology of today gives us new tools for designing knitwear by using scanners, digital cameras, and computer software. Put that together with special software used with the electronic home knitting machine to create personalized designs. Developing a routine and templates for creating these designs are very useful design aids. I will share some tips with you that you may find useful in creating your own designs for graphics used in hand or machine knitting, beadwork, cross stitch embroidery, or any craft work based on designs formed on graphic charts. I will keep it in "simple language" for those of you who just wish to get your picture to "the graph paper."
NOTE:Click on all images to see an enlargement of the photo!Photograph to Knit Sweater
Resolution
Most domestic knitting machines have a limitation of 4 colors within 1 row of knitting, unless you are knitting "intarsia" knitting which is only limited by the amount of time you wish to put into your project. Photos or drawings which are transformed into digital language on the other hand can contain millions of colors. Therefore, the first step is to preplan how you "enter" your photo or drawing information into the computer. The two most common forms are from a scanner or a digital camera. Both of these links come with software for selecting the "resolution" by which you obtain your image. Since I usually also print my image for use in a pattern I am writing for a magazine or my own publication, I start with a higher resolution. If my only purpose was to convert to a "graphic" for craft, scan at 200 or less resolution – a resolution of "72 " is what I ultimately end at. You can always select this setting in the preferences of your software for scanners. Digital cameras take higher resolutions. Personally, I don't like to start at 72 because in a lot of cases "too much detail" is lost. At a resolution of 200, the choices of what detail is lost is up to me! The key hint is that on a computer each pixel in a graphic design is a "square on the graphic design chart" or in knitting language each pixel is a knit stitch. Keep this in mind for later in this article!
Determine the Size of Your Graphic Chart
Knit your Swatch. Determine how many stitches and rows are in one inch. Decide how wide and long you want your design to be. Example if you are knitting a sweater and you want the design to fit in an upper yoke that is 20 inches wide and 10 inches high and your swatch told you that you obtained 7 stitches in one inch and 10 rows in one inch. Math example: 20 times 7 means your design can not be bigger that 140 stitches. 10 rows times 10 inches high. Your design can not be higher than 10 times 10 or 100 graphic rows high. A chart of 140 stitches wide and 100 rows high is Your Graphic Chart Size.
The Rectangular Knit Stitch
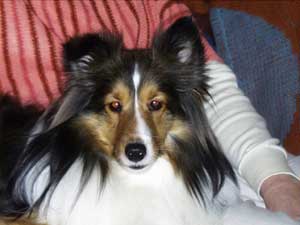
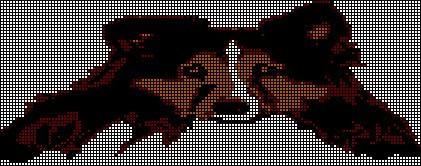
Knit Stitches are not "visually" sguare. They are rectangles. Common stitches and rows per inch for knit projects are 7 stitches wide by 10 rows high for sport weight yarn, or 8 stitches wide by 12 rows high for fingering weight yarn and so forth. You should design your project on a graph that is visually correct as you see it. See my example of my "Tori" sweater – look how funny Tori looks if I use a square grid!
Look at the top of this article to see how much better he looks on a chart in the correct proportions according to my knit swatch results! In the old days, we had special graph paper drawn in the special proportion of our stitches and rows. But just think about all the different sheets of paper we would have needed for all the possibilities! Remember a pixel on the computer is square, so we must convert it to the correct size rectangle. Today, we can easily set the correct size of our graphic grid in special software programs. See the next Section.
Color Reduction
Now, that I have my "picture" and have decided the size of my project, the next step is to reduce the colors of the image into what I wish to use in my knit design. This can be done in lots of computer "paint programs." But these programs eliminate the colors according to "math equations," and not my choice and therefore some of the details of our design could be lost. Fortunately, for us craft people, software has been developed that give us the choice of "what colors are eliminated." Two such programs that I am familiar with are Stitch Painter with "Full Color Import" module by Cochenille and Design A Knit. Since I am a "beta tester" for Cochenille from the onset of their software products, I am most familiar with them and I will use Stitch Painter as my example in the rest of the article. Since the operation of every software program is different and the space for this article is limited, I am only going to list the steps for doing your project. Refer to your own software programs for the details of performing the following steps.
Steps: Photo to Graphic Chart
1. Scan or obtain digital image from camera. If needed, isolate or extract the part of the photo you want.
2. Change image size to fit the width of designed final design according to the stitch gauge of your swatch. Keep the proportions in ratio so that the length will be set automatically.
3. For a Windows computer environment – Select this image and copy it to the clipboard.
4. Open Stitch Painter (or your software program).
5. Set the "document size" (graphic chart) to match the image size from your original camera or scanner program – step 2 above.
6. Set "the grid size" to the same proportion of your stitch and row gauge from your swatch. Example: 6 stitches per inch and 12 rows per inch. Dependant upon the room on your visual computer screen 6/12 is the same proportion as , 3/6, and 2/4. Stitches being the first number and rows being the 2nd number. Remember, in this case your graphic chart should look taller, then wider. 6. In Stitch Painter, I select the whole chart, then Paste Special- the design into the chart.
7. At this point your design is narrowed down to the number of colors that you have chosen in your preferences for the "Full Color Import Module." I usually narrow it down to 8 colors. Then I like to manually change the rest of the colors according to the way I like the accents.
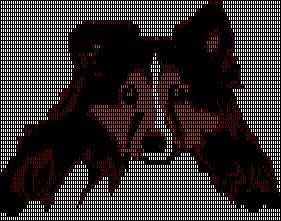
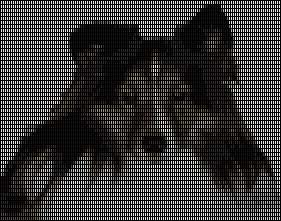
8. Save your chart in various stages in case you change your mind. See my images of Tori from first color import to the final four color choices. This last step of color cleanup may be time consuming, but it is well worth your effort!
Digital Images Converted into Personalized Knits
The Knit Tree specializes in personalized knitting so the information in this article is used a lot. Our knitted Native American designs often start from a photo of a tattoo, an old drawing, or a Native American basket. We convert the logos from Native American Rancheria's, reservations, and casinos into logo caps, logo blankets, scarves or other special projects. Then, we hand loom these personalized knits and wholesale them to the client for their gift shop.
Some of our clients are just an individual who want a personalized picture put on a sweater or other knit item. We've knit dogs, airplanes, cars, even children's drawings on knit projects. We have logo knits for clubs Our knitted baby clothes feature personalized information that the family wishes to record. What fun it is to see how happy they are to have such a memory gift. You too can apply these digital conversion techniques to make your own personalized knits.
Now you can apply your graphic chart to a variety of different craft projects. Go to our online knitting catalog to see our personalized knits.
See my finished Tori Sweater in the Personalized Showroom of The Knit Tree web site.
Visit us on facebook too ~ page is in development
